







Prepare to start.
* YOUR FIRST EXERCISE REQUIRES THE STRENGTH BAND - ANCHORED LOW *
ROW - LEFT
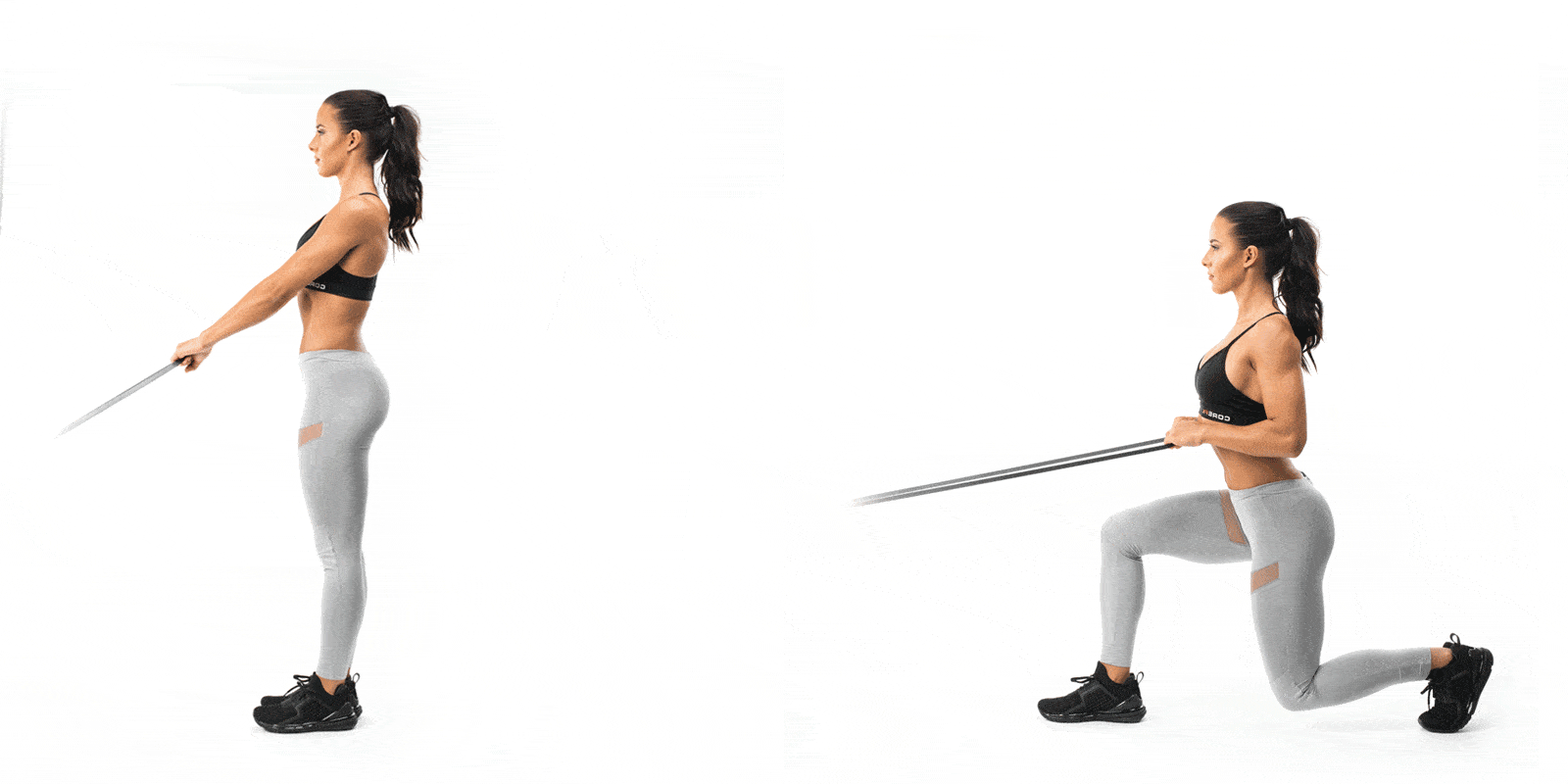
Description: Face your low anchor point in an upright stance, holding onto the band with both hands at waist height; step back with your left leg into a reverse lunge as you bend the arms and pull the band toward your torso; keep your shoulders over your hips, head level, and knees bent about 90-degrees
Coach’s Tip: This compound (lunge/row) exercise targets whole body stabilization and unilateral (independent) leg work, and you sculpt the legs (lunge) while toning your upper body (row). Do not bend over at the waist; keep your torso upright. Add more resistance by moving away from the anchor point or using a heavier band. Decrease intensity by limiting ROM, slowing down or lightening the load/resistance of the band.
Take a moment to rest before switching to the RIGHT LEG.
ROW - RIGHT
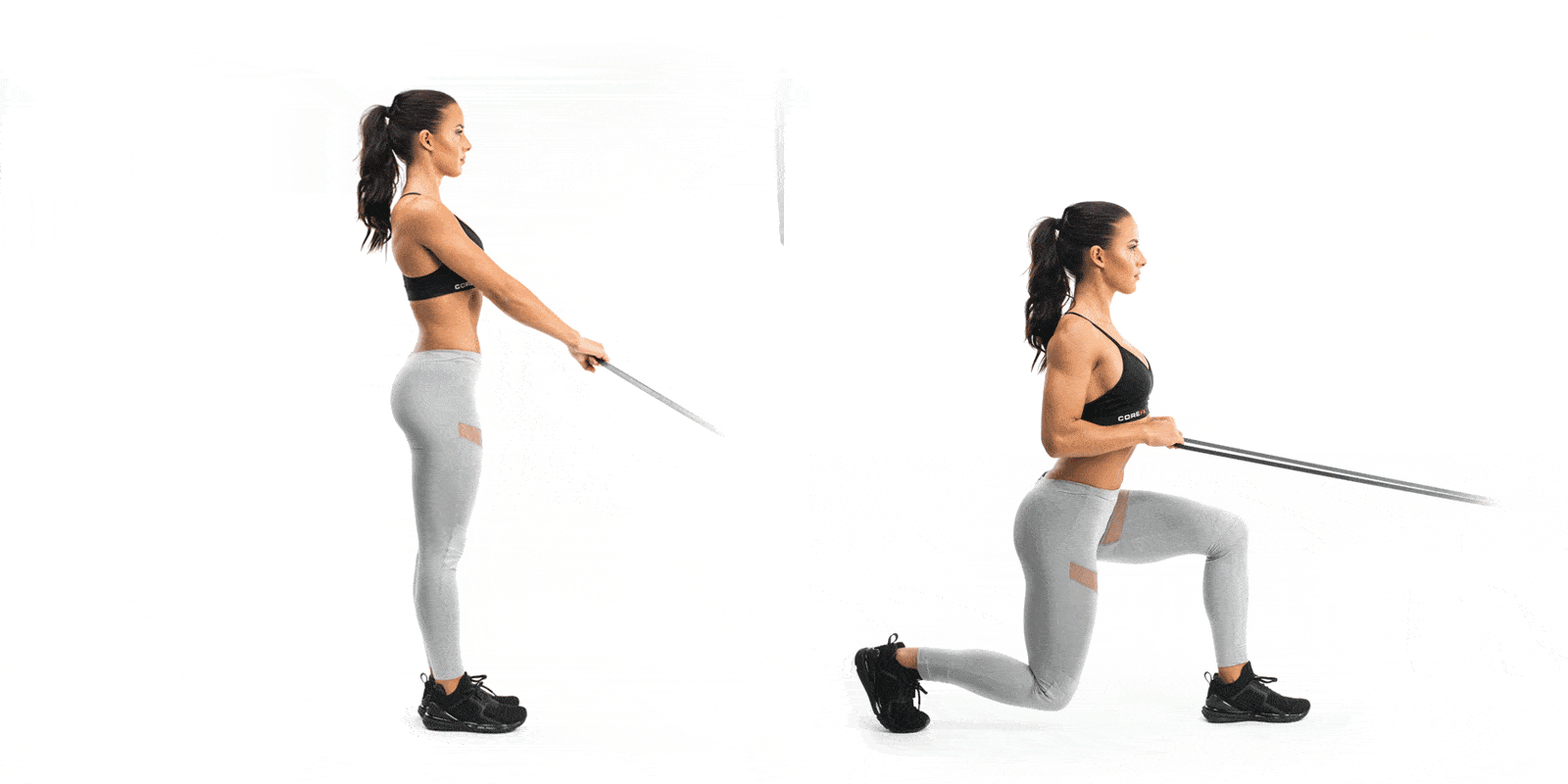
Description: Face your low anchor point in an upright stance, holding onto the band with both hands at waist height; step back with your left leg into a reverse lunge as you bend the arms and pull the band toward your torso; keep your shoulders over your hips, head level, and knees bent about 90-degrees.
Coach’s Tip: This compound (lunge/row) exercise targets whole body stabilization and unilateral (independent) leg work, and you sculpt the legs (lunge) while toning your upper body (row). Do not bend over at the waist; keep your torso upright. Add more resistance by moving away from the anchor point or using a heavier band. Decrease intensity by limiting ROM, slowing down or lightening the load/resistance of the band.
Take a moment to rest before starting the next exercise in this workout.
* YOUR NEXT EXERCISE REQUIRES THE STRENGTH BAND - ANCHORED LOW *
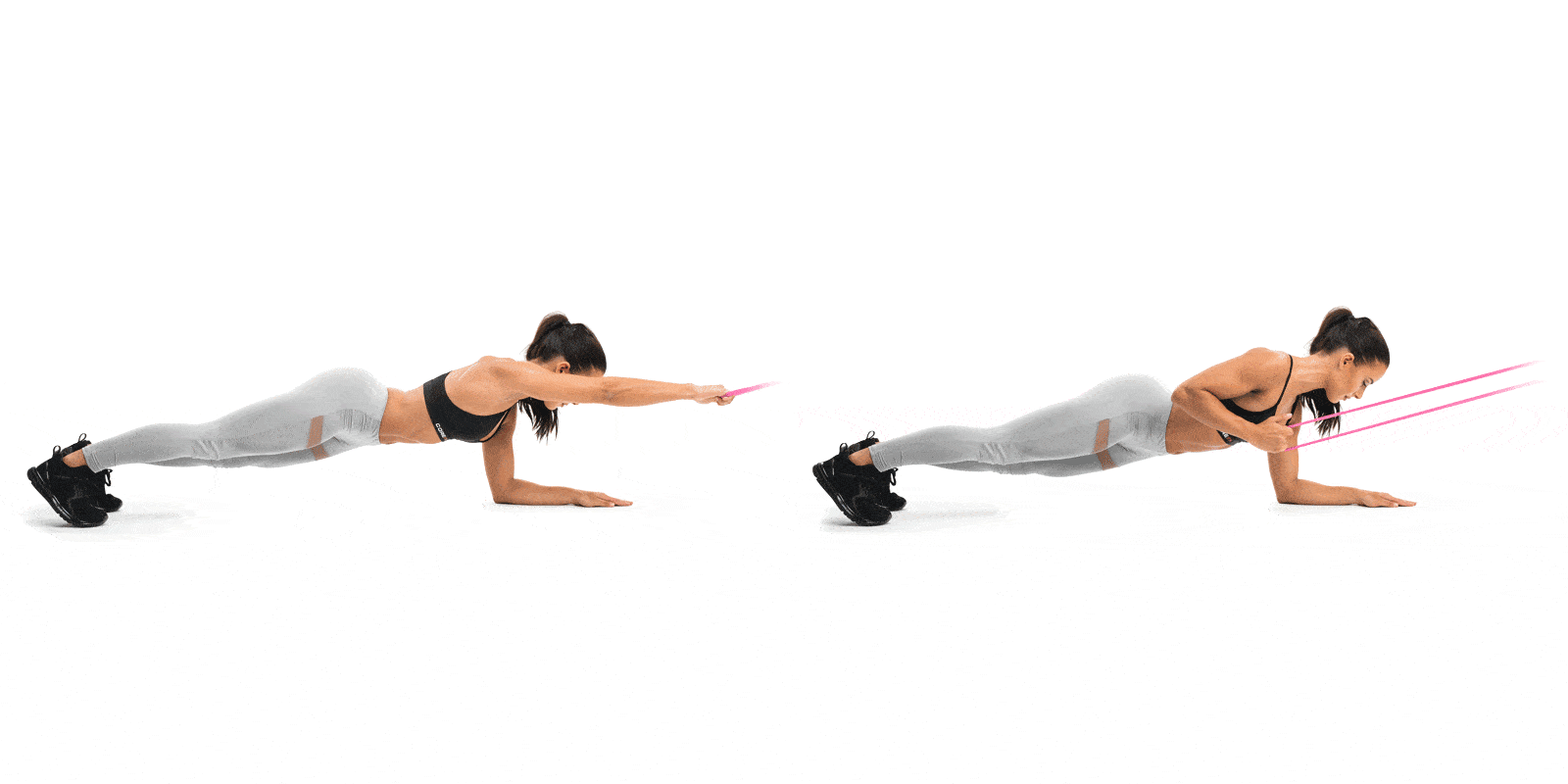
Description: Anchor the band in front of you; lower your body into a plank position with your forearm on the ground and your elbow bent 90-degrees; in this supported prone position, grasp the band with your left hand, by reaching overhead toward your low anchor point; establish tension in the band before you pull; stabilize this set-up by tightening your upper back and core muscles as you pull the arm back toward your torso.
Coach’s Tip: This exercise targets whole body stabilization and especially challenges the core as a stabilizer. Working muscles include the biceps, back of the shoulder and the lats as the band is pulled. Add more resistance by moving away from the anchor point or using a heavier band. Decrease intensity by limiting ROM, slowing down or lightening the load/resistance of the band.
Take a moment to rest before switching to the RIGHT ARM.
Description: Anchor the band in front of you; lower your body into a plank position with your forearm on the ground and your elbow bent 90-degrees; in this supported prone position, grasp the band with your right hand, by reaching overhead toward your low anchor point; establish tension in the band before you pull; stabilize this set-up by tightening your upper back and core muscles as you pull the arm back toward your torso.
Coach’s Tip: This exercise targets whole body stabilization and especially challenges the core as a stabilizer. Working muscles include the biceps, back of the shoulder and the lats as the band is pulled. Add more resistance by moving away from the anchor point or using a heavier band. Decrease intensity by limiting ROM, slowing down or lightening the load/resistance of the band.
Take a moment to rest before starting the next exercise in this workout.
* YOUR NEXT EXERCISE REQUIRES THE STRENGTH BAND - ANCHORED *
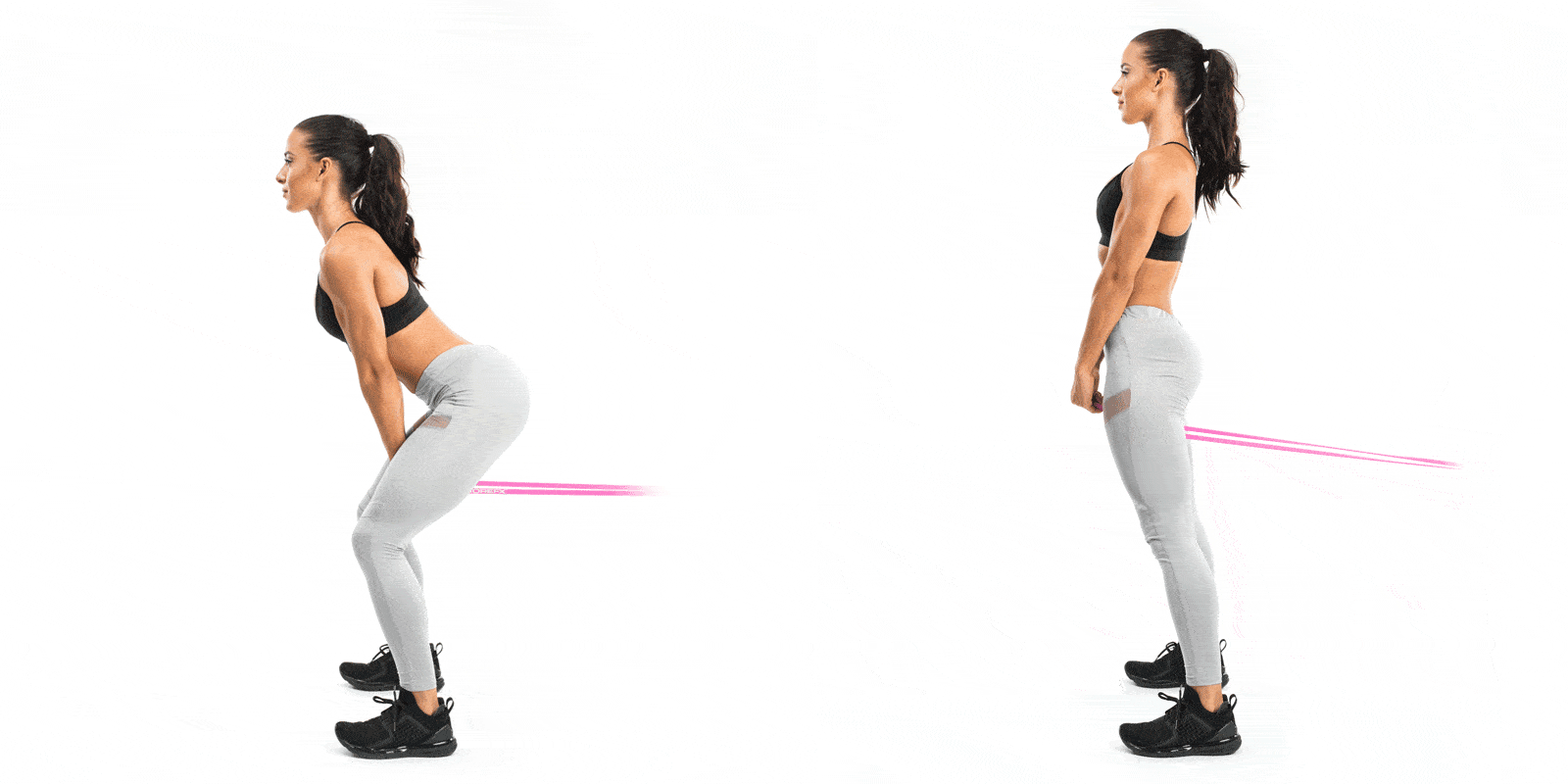
THRUSTER
Description: Stand with your knees and hips flexed, grasping the band between your legs, with the anchor point behind you; slightly lean forward from the hips, but do not fold over excessively from the waist; straighten the legs and drive your hips forward, as you simultaneously pull the band through; return to the start position and repeat; increase difficulty by flexing your hips and knees deeper in the start position.
Coach’s Tip: This classic, multi-joint, whole body integrated exercise drives your calorie burn and targets the hips and legs as primary muscles and the core and upper body as stabilizers. Increase mobility and intensity (calorie burn) by flexing your hips and knees deeper in the start position. Decrease intensity by limiting ROM, slowing down or lightening the load/resistance of the band.
Take a moment to rest before starting the next exercise in this workout.
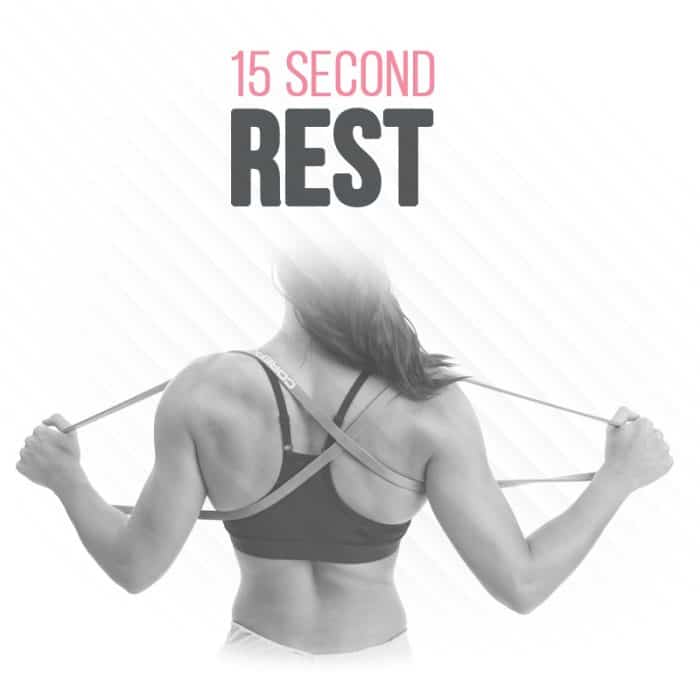
* YOUR NEXT EXERCISE REQUIRES THE LIGHT STRENGTH BAND - POSITIONED CROSSED OVER YOUR SHOULDERS (See Image) *
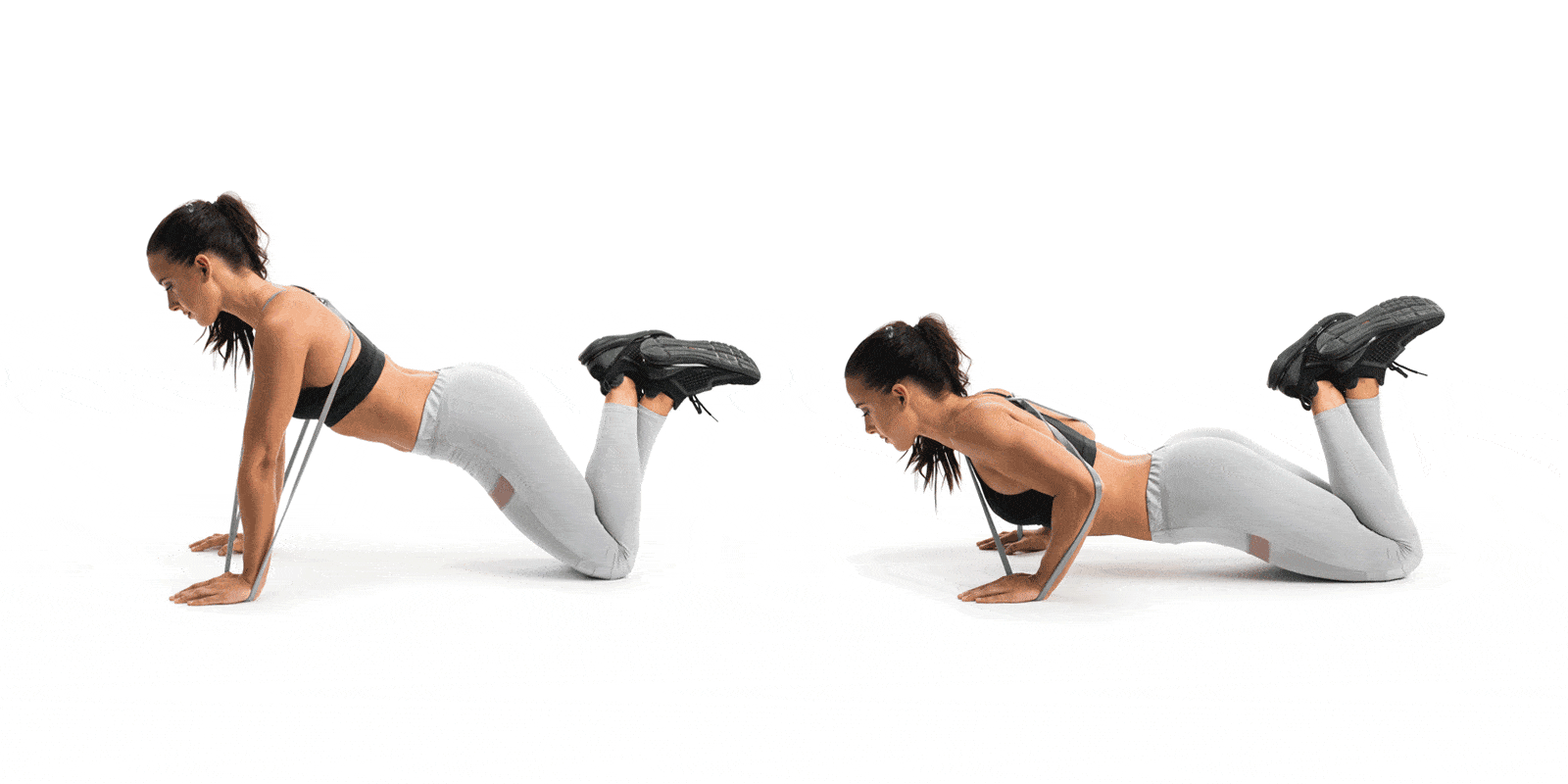
Description: Position the band crisscrossed over and under your shoulders; grasp the band and position your body facing the floor with your knees and hands in contact with the floor; from this short lever position, lower your chest toward the floor; return to a straight arm position.
Coach’s Tip: This exercise challenges your core as a stabilizer, and targets your chest, fronts of the shoulder and backs of the upper arm. Be sure to keep your head level and don’t hyperextend your elbows when the arms straighten. Add more resistance by using a heavier band.
Prepare to start round 2!
* YOUR NEXT EXERCISE REQUIRES THE STRENGTH BAND - ANCHORED LOW *
ROW - LEFT
Description: Face your low anchor point in an upright stance, holding onto the band with both hands at waist height; step back with your left leg into a reverse lunge as you bend the arms and pull the band toward your torso; keep your shoulders over your hips, head level, and knees bent about 90-degrees
Coach’s Tip: This compound (lunge/row) exercise targets whole body stabilization and unilateral (independent) leg work, and you sculpt the legs (lunge) while toning your upper body (row). Do not bend over at the waist; keep your torso upright. Add more resistance by moving away from the anchor point or using a heavier band. Decrease intensity by limiting ROM, slowing down or lightening the load/resistance of the band.
Take a moment to rest before switching to the RIGHT LEG.
ROW - RIGHT
Description: Face your low anchor point in an upright stance, holding onto the band with both hands at waist height; step back with your left leg into a reverse lunge as you bend the arms and pull the band toward your torso; keep your shoulders over your hips, head level, and knees bent about 90-degrees.
Coach’s Tip: This compound (lunge/row) exercise targets whole body stabilization and unilateral (independent) leg work, and you sculpt the legs (lunge) while toning your upper body (row). Do not bend over at the waist; keep your torso upright. Add more resistance by moving away from the anchor point or using a heavier band. Decrease intensity by limiting ROM, slowing down or lightening the load/resistance of the band.
Take a moment to rest before starting the next exercise in this workout.
* YOUR NEXT EXERCISE REQUIRES THE STRENGTH BAND - ANCHORED LOW *
Description: Anchor the band in front of you; lower your body into a plank position with your forearm on the ground and your elbow bent 90-degrees; in this supported prone position, grasp the band with your left hand, by reaching overhead toward your low anchor point; establish tension in the band before you pull; stabilize this set-up by tightening your upper back and core muscles as you pull the arm back toward your torso.
Coach’s Tip: This exercise targets whole body stabilization and especially challenges the core as a stabilizer. Working muscles include the biceps, back of the shoulder and the lats as the band is pulled. Add more resistance by moving away from the anchor point or using a heavier band. Decrease intensity by limiting ROM, slowing down or lightening the load/resistance of the band.
Take a moment to rest before switching to the RIGHT ARM.
Description: Anchor the band in front of you; lower your body into a plank position with your forearm on the ground and your elbow bent 90-degrees; in this supported prone position, grasp the band with your right hand, by reaching overhead toward your low anchor point; establish tension in the band before you pull; stabilize this set-up by tightening your upper back and core muscles as you pull the arm back toward your torso.
Coach’s Tip: This exercise targets whole body stabilization and especially challenges the core as a stabilizer. Working muscles include the biceps, back of the shoulder and the lats as the band is pulled. Add more resistance by moving away from the anchor point or using a heavier band. Decrease intensity by limiting ROM, slowing down or lightening the load/resistance of the band.
Take a moment to rest before starting the next exercise in this workout.
* YOUR NEXT EXERCISE REQUIRES THE STRENGTH BAND - ANCHORED *
THRUSTER
Description: Stand with your knees and hips flexed, grasping the band between your legs, with the anchor point behind you; slightly lean forward from the hips, but do not fold over excessively from the waist; straighten the legs and drive your hips forward, as you simultaneously pull the band through; return to the start position and repeat; increase difficulty by flexing your hips and knees deeper in the start position.
Coach’s Tip: This classic, multi-joint, whole body integrated exercise drives your calorie burn and targets the hips and legs as primary muscles and the core and upper body as stabilizers. Increase mobility and intensity (calorie burn) by flexing your hips and knees deeper in the start position. Decrease intensity by limiting ROM, slowing down or lightening the load/resistance of the band.
Take a moment to rest before starting the next exercise in this workout.
* YOUR NEXT EXERCISE REQUIRES THE LIGHT STRENGTH BAND - POSITIONED CROSSED OVER YOUR SHOULDERS (See Image) *
Description: Position the band crisscrossed over and under your shoulders; grasp the band and position your body facing the floor with your knees and hands in contact with the floor; from this short lever position, lower your chest toward the floor; return to a straight arm position.
Coach’s Tip: This exercise challenges your core as a stabilizer, and targets your chest, fronts of the shoulder and backs of the upper arm. Be sure to keep your head level and don’t hyperextend your elbows when the arms straighten. Add more resistance by using a heavier band.
Prepare to start round 3!
* YOUR NEXT EXERCISE REQUIRES THE STRENGTH BAND - ANCHORED LOW *
ROW - LEFT
Description: Face your low anchor point in an upright stance, holding onto the band with both hands at waist height; step back with your left leg into a reverse lunge as you bend the arms and pull the band toward your torso; keep your shoulders over your hips, head level, and knees bent about 90-degrees
Coach’s Tip: This compound (lunge/row) exercise targets whole body stabilization and unilateral (independent) leg work, and you sculpt the legs (lunge) while toning your upper body (row). Do not bend over at the waist; keep your torso upright. Add more resistance by moving away from the anchor point or using a heavier band. Decrease intensity by limiting ROM, slowing down or lightening the load/resistance of the band.
Take a moment to rest before switching to the RIGHT LEG.
ROW - RIGHT
Description: Face your low anchor point in an upright stance, holding onto the band with both hands at waist height; step back with your left leg into a reverse lunge as you bend the arms and pull the band toward your torso; keep your shoulders over your hips, head level, and knees bent about 90-degrees.
Coach’s Tip: This compound (lunge/row) exercise targets whole body stabilization and unilateral (independent) leg work, and you sculpt the legs (lunge) while toning your upper body (row). Do not bend over at the waist; keep your torso upright. Add more resistance by moving away from the anchor point or using a heavier band. Decrease intensity by limiting ROM, slowing down or lightening the load/resistance of the band.
Take a moment to rest before starting the next exercise in this workout.
* YOUR NEXT EXERCISE REQUIRES THE STRENGTH BAND - ANCHORED LOW *
Description: Anchor the band in front of you; lower your body into a plank position with your forearm on the ground and your elbow bent 90-degrees; in this supported prone position, grasp the band with your left hand, by reaching overhead toward your low anchor point; establish tension in the band before you pull; stabilize this set-up by tightening your upper back and core muscles as you pull the arm back toward your torso.
Coach’s Tip: This exercise targets whole body stabilization and especially challenges the core as a stabilizer. Working muscles include the biceps, back of the shoulder and the lats as the band is pulled. Add more resistance by moving away from the anchor point or using a heavier band. Decrease intensity by limiting ROM, slowing down or lightening the load/resistance of the band.
Take a moment to rest before switching to the RIGHT ARM.
Description: Anchor the band in front of you; lower your body into a plank position with your forearm on the ground and your elbow bent 90-degrees; in this supported prone position, grasp the band with your right hand, by reaching overhead toward your low anchor point; establish tension in the band before you pull; stabilize this set-up by tightening your upper back and core muscles as you pull the arm back toward your torso.
Coach’s Tip: This exercise targets whole body stabilization and especially challenges the core as a stabilizer. Working muscles include the biceps, back of the shoulder and the lats as the band is pulled. Add more resistance by moving away from the anchor point or using a heavier band. Decrease intensity by limiting ROM, slowing down or lightening the load/resistance of the band.
Take a moment to rest before starting the next exercise in this workout.
* YOUR NEXT EXERCISE REQUIRES THE STRENGTH BAND - ANCHORED *
THRUSTER
Description: Stand with your knees and hips flexed, grasping the band between your legs, with the anchor point behind you; slightly lean forward from the hips, but do not fold over excessively from the waist; straighten the legs and drive your hips forward, as you simultaneously pull the band through; return to the start position and repeat; increase difficulty by flexing your hips and knees deeper in the start position.
Coach’s Tip: This classic, multi-joint, whole body integrated exercise drives your calorie burn and targets the hips and legs as primary muscles and the core and upper body as stabilizers. Increase mobility and intensity (calorie burn) by flexing your hips and knees deeper in the start position. Decrease intensity by limiting ROM, slowing down or lightening the load/resistance of the band.
Take a moment to rest before starting the next exercise in this workout.
* YOUR NEXT EXERCISE REQUIRES THE LIGHT STRENGTH BAND - POSITIONED CROSSED OVER YOUR SHOULDERS (See Image) *
Description: Position the band crisscrossed over and under your shoulders; grasp the band and position your body facing the floor with your knees and hands in contact with the floor; from this short lever position, lower your chest toward the floor; return to a straight arm position.
Coach’s Tip: This exercise challenges your core as a stabilizer, and targets your chest, fronts of the shoulder and backs of the upper arm. Be sure to keep your head level and don’t hyperextend your elbows when the arms straighten. Add more resistance by using a heavier band.
Prepare to start round 4!
* YOUR NEXT EXERCISE REQUIRES THE STRENGTH BAND - ANCHORED LOW *
ROW - LEFT
Description: Face your low anchor point in an upright stance, holding onto the band with both hands at waist height; step back with your left leg into a reverse lunge as you bend the arms and pull the band toward your torso; keep your shoulders over your hips, head level, and knees bent about 90-degrees
Coach’s Tip: This compound (lunge/row) exercise targets whole body stabilization and unilateral (independent) leg work, and you sculpt the legs (lunge) while toning your upper body (row). Do not bend over at the waist; keep your torso upright. Add more resistance by moving away from the anchor point or using a heavier band. Decrease intensity by limiting ROM, slowing down or lightening the load/resistance of the band.
Take a moment to rest before switching to the RIGHT LEG.
ROW - RIGHT
Description: Face your low anchor point in an upright stance, holding onto the band with both hands at waist height; step back with your left leg into a reverse lunge as you bend the arms and pull the band toward your torso; keep your shoulders over your hips, head level, and knees bent about 90-degrees.
Coach’s Tip: This compound (lunge/row) exercise targets whole body stabilization and unilateral (independent) leg work, and you sculpt the legs (lunge) while toning your upper body (row). Do not bend over at the waist; keep your torso upright. Add more resistance by moving away from the anchor point or using a heavier band. Decrease intensity by limiting ROM, slowing down or lightening the load/resistance of the band.
Take a moment to rest before starting the next exercise in this workout.
* YOUR NEXT EXERCISE REQUIRES THE STRENGTH BAND - ANCHORED LOW *
Description: Anchor the band in front of you; lower your body into a plank position with your forearm on the ground and your elbow bent 90-degrees; in this supported prone position, grasp the band with your left hand, by reaching overhead toward your low anchor point; establish tension in the band before you pull; stabilize this set-up by tightening your upper back and core muscles as you pull the arm back toward your torso.
Coach’s Tip: This exercise targets whole body stabilization and especially challenges the core as a stabilizer. Working muscles include the biceps, back of the shoulder and the lats as the band is pulled. Add more resistance by moving away from the anchor point or using a heavier band. Decrease intensity by limiting ROM, slowing down or lightening the load/resistance of the band.
Take a moment to rest before switching to the RIGHT ARM.
Description: Anchor the band in front of you; lower your body into a plank position with your forearm on the ground and your elbow bent 90-degrees; in this supported prone position, grasp the band with your right hand, by reaching overhead toward your low anchor point; establish tension in the band before you pull; stabilize this set-up by tightening your upper back and core muscles as you pull the arm back toward your torso.
Coach’s Tip: This exercise targets whole body stabilization and especially challenges the core as a stabilizer. Working muscles include the biceps, back of the shoulder and the lats as the band is pulled. Add more resistance by moving away from the anchor point or using a heavier band. Decrease intensity by limiting ROM, slowing down or lightening the load/resistance of the band.
Take a moment to rest before starting the next exercise in this workout.
* YOUR NEXT EXERCISE REQUIRES THE STRENGTH BAND - ANCHORED *
THRUSTER
Description: Stand with your knees and hips flexed, grasping the band between your legs, with the anchor point behind you; slightly lean forward from the hips, but do not fold over excessively from the waist; straighten the legs and drive your hips forward, as you simultaneously pull the band through; return to the start position and repeat; increase difficulty by flexing your hips and knees deeper in the start position.
Coach’s Tip: This classic, multi-joint, whole body integrated exercise drives your calorie burn and targets the hips and legs as primary muscles and the core and upper body as stabilizers. Increase mobility and intensity (calorie burn) by flexing your hips and knees deeper in the start position. Decrease intensity by limiting ROM, slowing down or lightening the load/resistance of the band.
Take a moment to rest before starting the next exercise in this workout.
* YOUR NEXT EXERCISE REQUIRES THE LIGHT STRENGTH BAND - POSITIONED CROSSED OVER YOUR SHOULDERS (See Image) *
Description: Position the band crisscrossed over and under your shoulders; grasp the band and position your body facing the floor with your knees and hands in contact with the floor; from this short lever position, lower your chest toward the floor; return to a straight arm position.
Coach’s Tip: This exercise challenges your core as a stabilizer, and targets your chest, fronts of the shoulder and backs of the upper arm. Be sure to keep your head level and don’t hyperextend your elbows when the arms straighten. Add more resistance by using a heavier band.