






Prepare to start.
* YOUR FIRST EXERCISE REQUIRES THE STRONG MINI BAND *
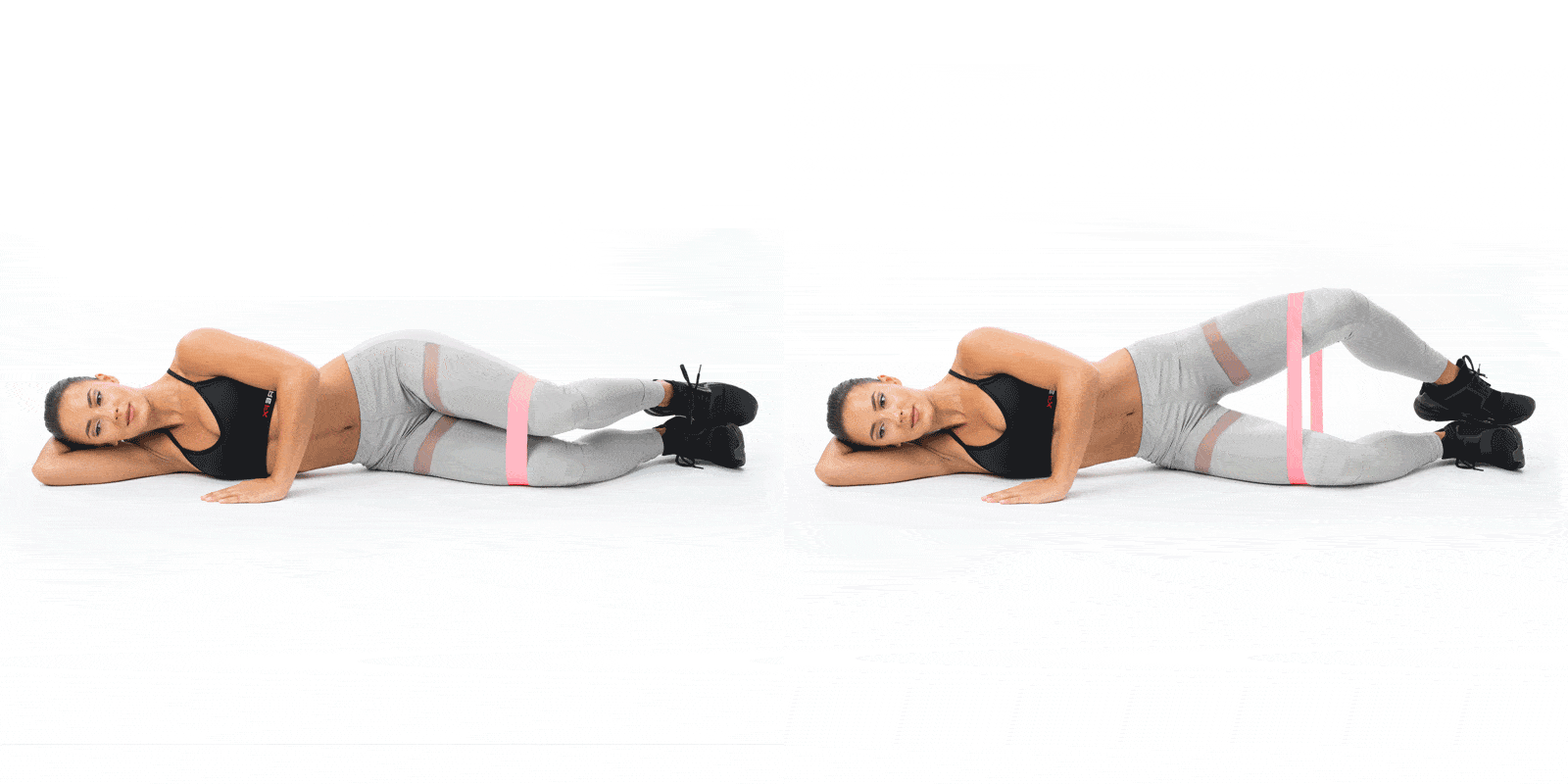
Description: In a sidelying position place the band just above your knees with your right arm under your head and your left top arm resting on the floor with the elbow bent 90-degrees; keep the knees and hips slight flexed (a little bend) and the hips in line with your shoulders; maintain this stabilized start position as you externally rotate your upper leg by moving your left knee toward the ceiling; keep your feet in contact with one another and don’t open your hips (belly facing the ceiling).
Coach’s Tip: This isolation exercise target the upper back and core as stabilizers, and the glute muscles as the prime muscles being worked. Keep your head aligned, and don’t let your hips turn, resulting in your abs facing the ceiling. To make the exercise harder, use a stronger or multiple bands. Decrease intensity by limiting ROM, slowing down or lightening the load/resistance of the band.
Take a moment to rest before switching to the RIGHT LEG.
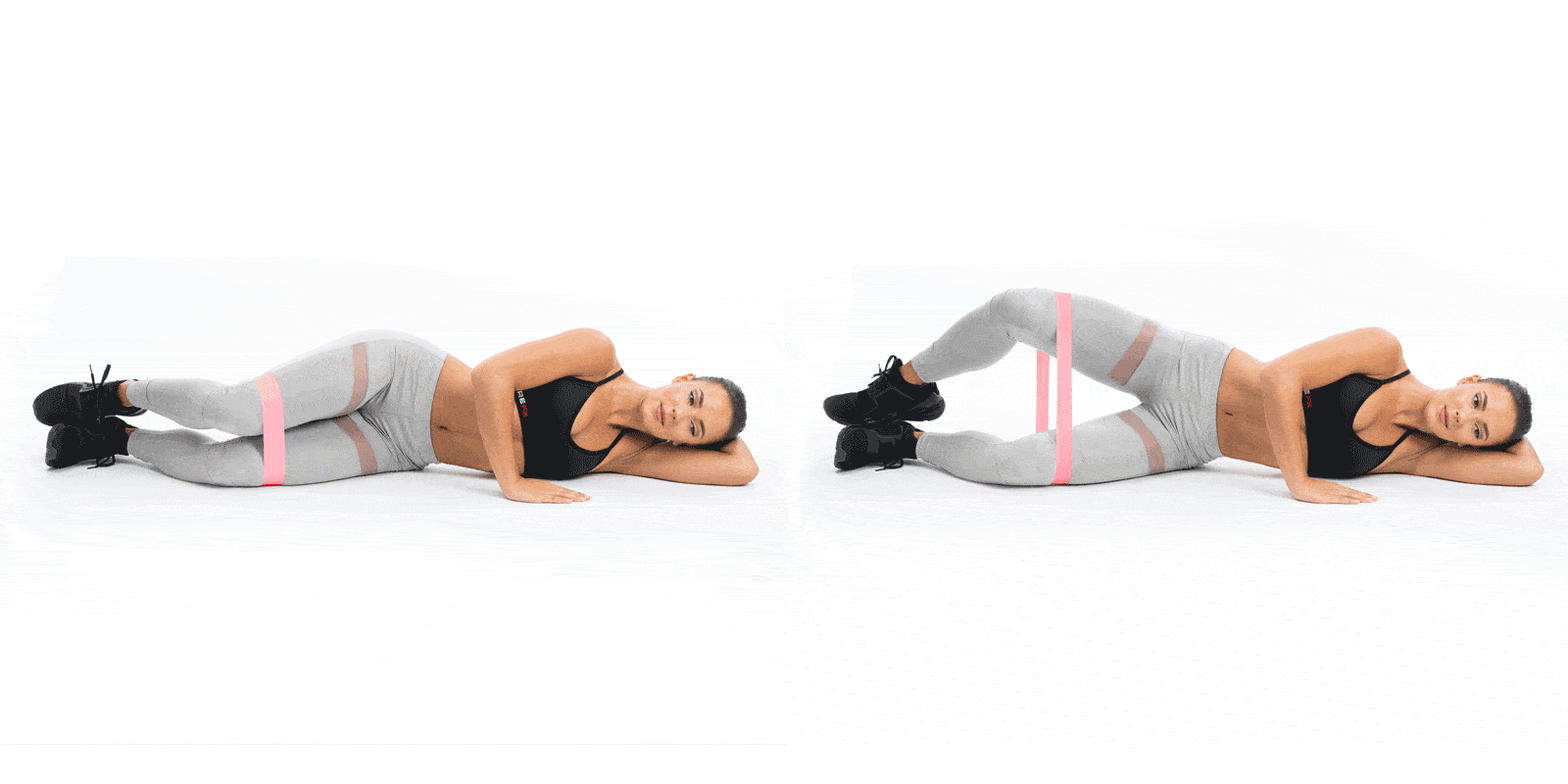
Description: In a sidelying position place the band just above your knees with your left arm under your head and your right top arm resting on the floor with the elbow bent 90-degrees; keep the knees and hips slight flexed (a little bend) and the hips in line with your shoulders; maintain this stabilized start position as you externally rotate your upper leg by moving your right knee toward the ceiling; keep your feet in contact with one another and don’t open your hips (belly facing the ceiling).
Coach’s Tip: This isolation exercise target the upper back and core as stabilizers, and the glute muscles as the prime muscles being worked. Keep your head aligned, and don’t let your hips turn, resulting in your abs facing the ceiling. To make the exercise harder, use a stronger or multiple bands. Decrease intensity by limiting ROM, slowing down or lightening the load/resistance of the band.
Take a moment to rest before starting the next exercise in this workout.
* YOUR NEXT EXERCISE REQUIRES TWO MINI BANDS *
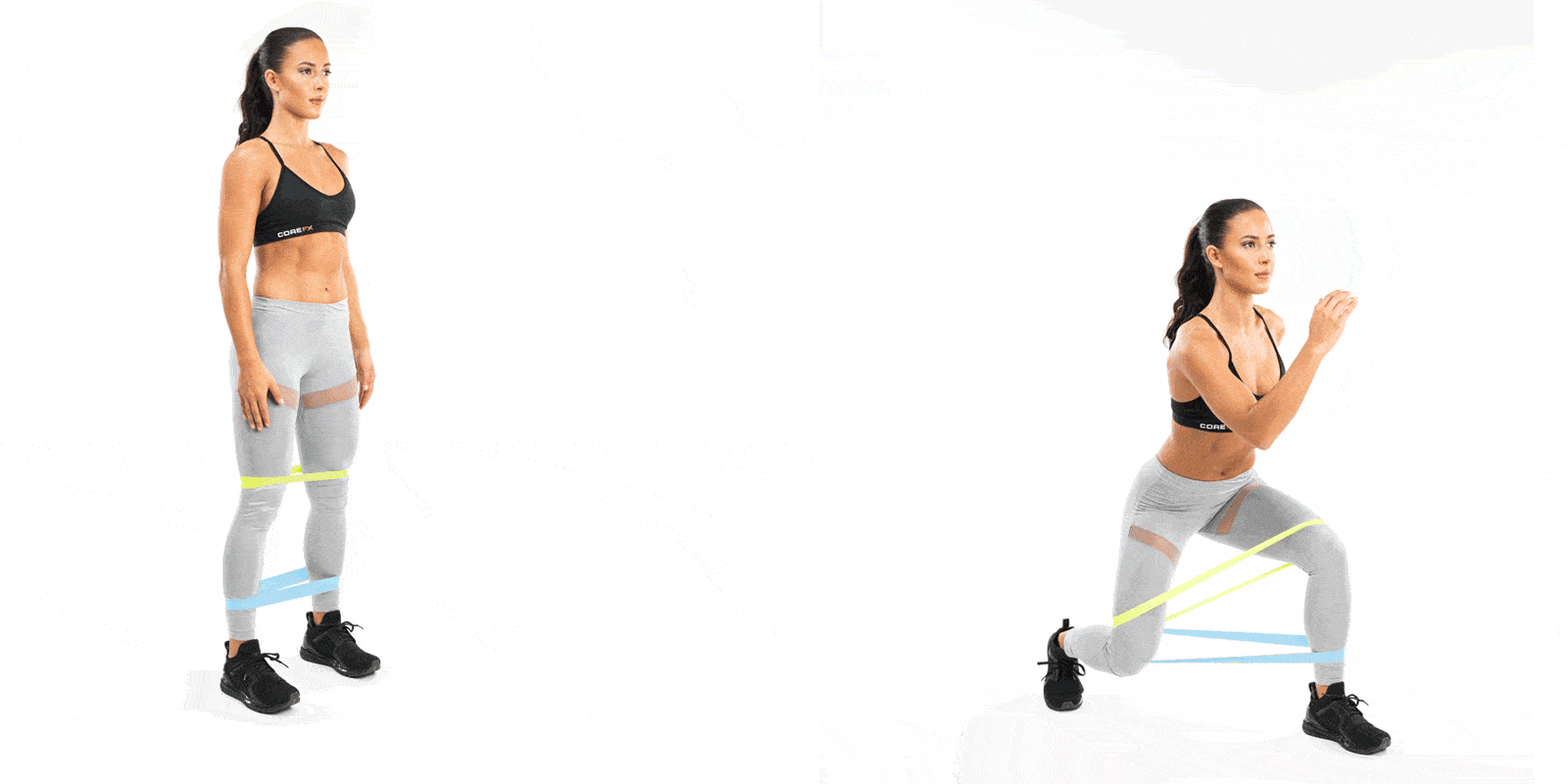
Description: Start in an upright standing position, feet shoulder width apart, with one band placed just above your knees and the other above your ankles; step forward moving the hands and legs in opposition (just like when you walk or run); return to start position and repeat.
Coach’s Tip: This lower body sculpting exercise challenges the outer hips and glutes because of the 2-lines of opposing resistance provided by the 2-band system. Make the exercise harder by lunging deeper, using heavier bands, moving faster or increasing range of motion. Decrease intensity by limiting ROM, slowing down or lightening the load/resistance of the band.
Take a moment to rest before switching to the RIGHT.
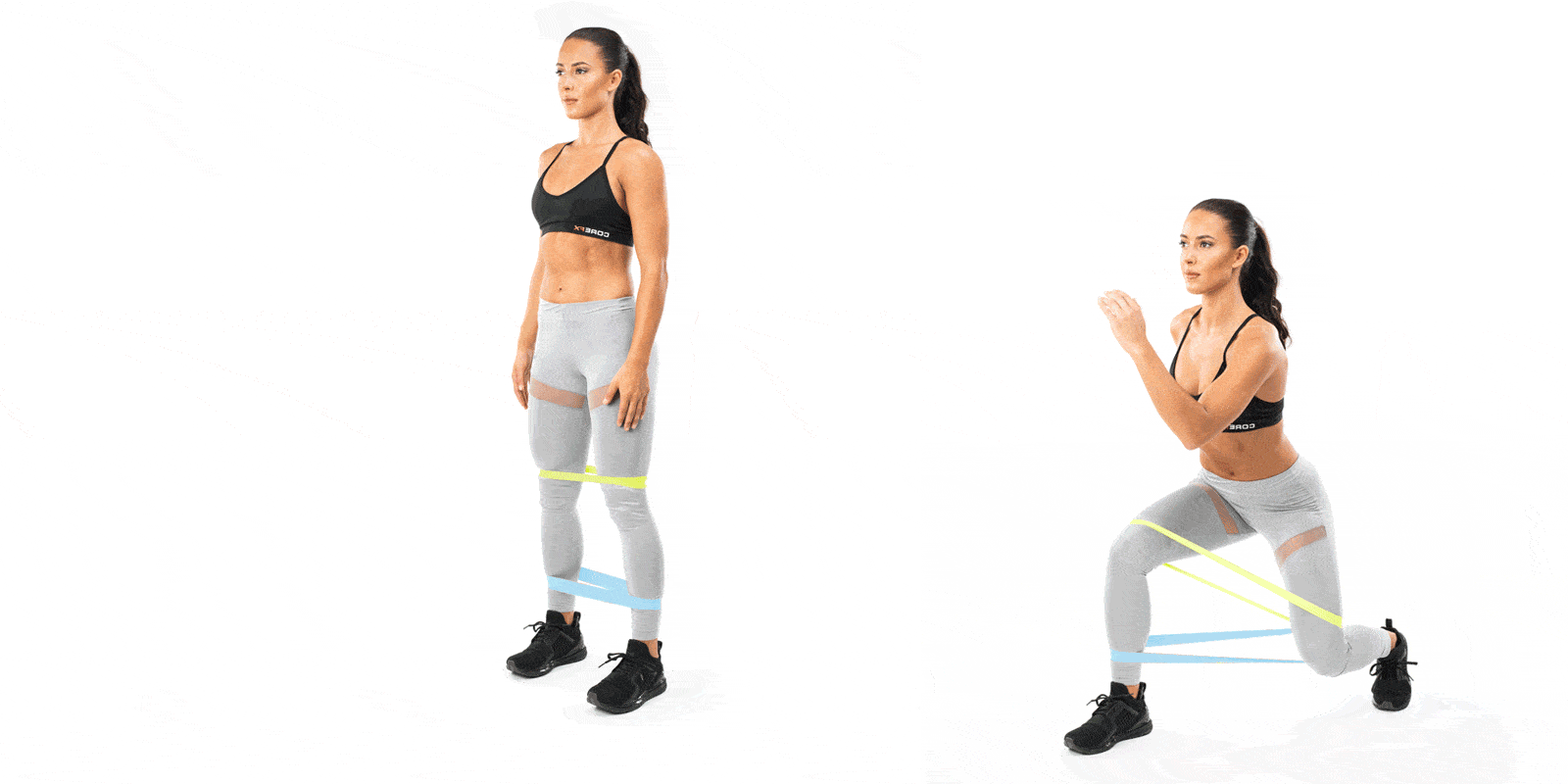
Description: Start in an upright standing position, feet shoulder width apart, with one band placed just above your knees and the other above your ankles; step forward moving the hands and legs in opposition (just like when you walk or run); return to start position and repeat.
Coach’s Tip: This lower body sculpting exercise challenges the outer hips and glutes because of the 2-lines of opposing resistance provided by the 2-band system. Make the exercise harder by lunging deeper, using heavier bands, moving faster or increasing range of motion. Decrease intensity by limiting ROM, slowing down or lightening the load/resistance of the band.
Take a moment to rest before starting the next exercise in this workout.
* YOUR NEXT EXERCISE REQUIRES ONE MINI BAND *
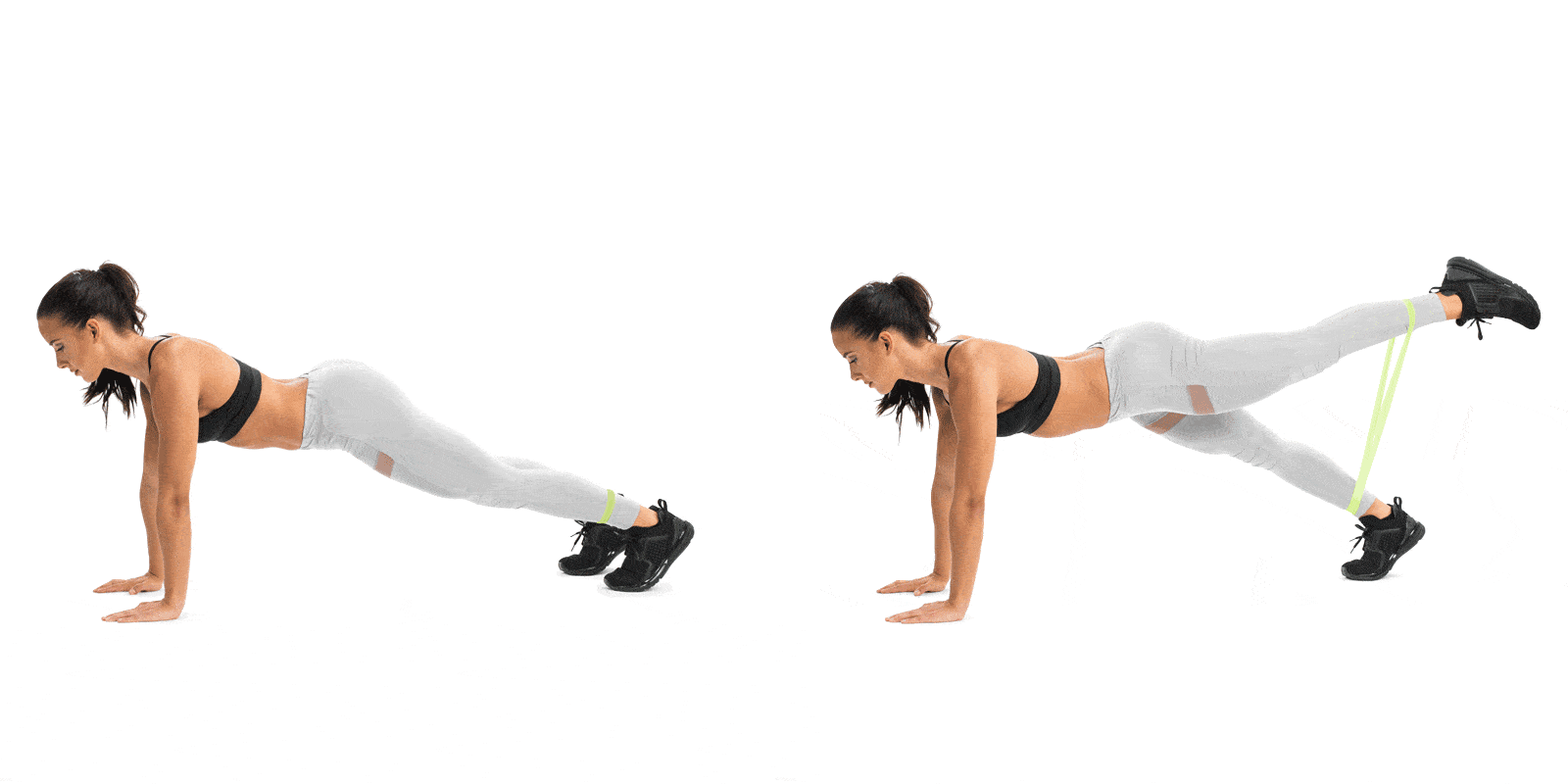
Description: Set up your plank by positioning your hands underneath your shoulders, and feet shoulder width apart with the band placed around, and just above your ankles. Extend your left leg until it is inline with your glutes. Slowly return to the start position and repeat.
Coach’s Tip: This exercise will challenge your CORE and upper body as a stabilizers while working your glutes and hamstrings. Keep your head in line with your spine. Use a smaller range of motion to decrease the challenge. Adjust resistance by using a lighter, heavier or multiple bands.
Take a moment to rest before switching to the RIGHT.
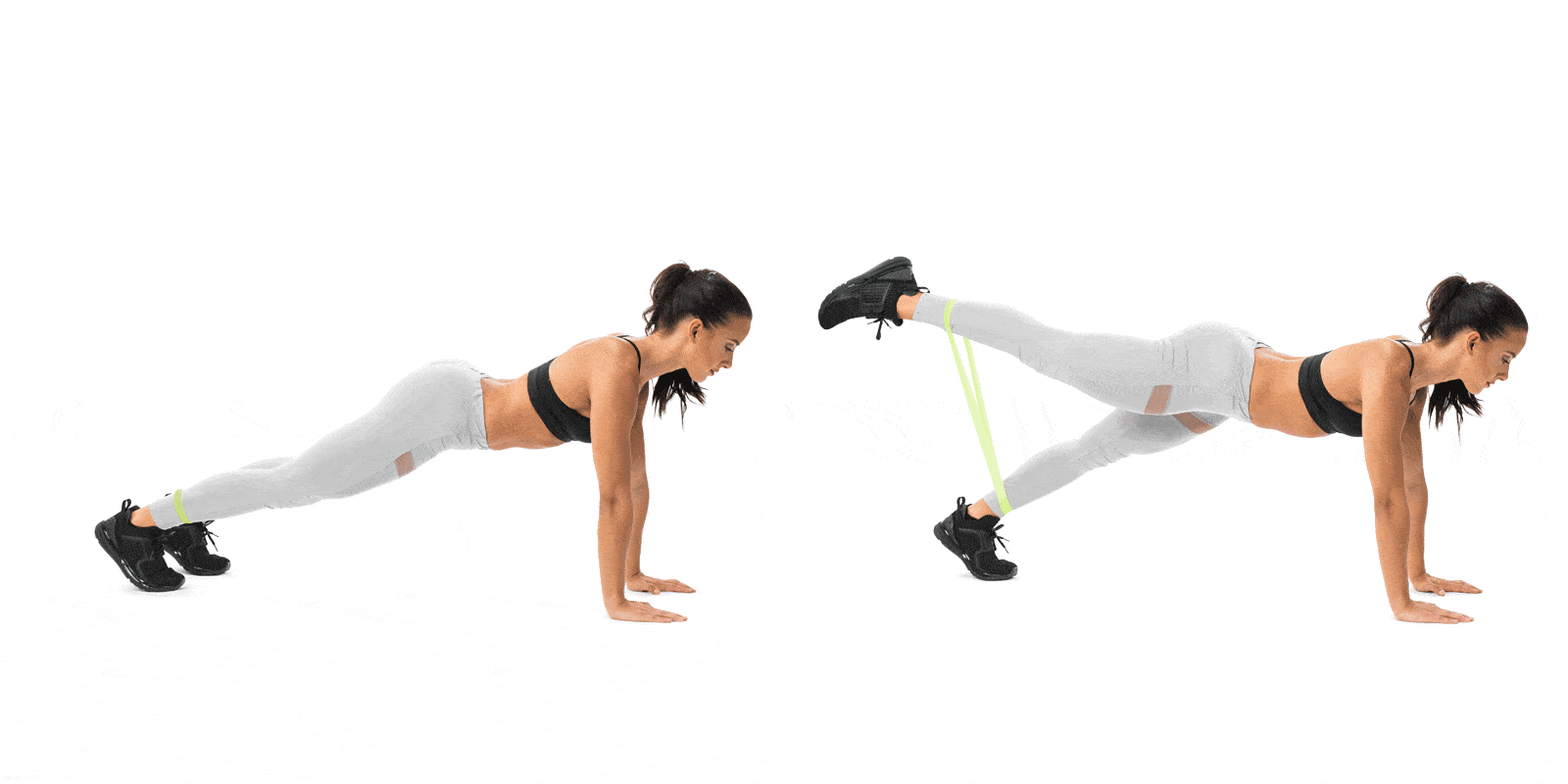
Description: Set up your plank by positioning your hands underneath your shoulders, and feet shoulder width apart with the band placed around, and just above your ankles. Begin by extending your right leg until it is inline with your glutes. Slowly return to the start position and repeat.
Coach’s Tip: This exercise will challenge your CORE and upper body as a stabilizers while working your glutes and hamstrings. Keep your head in line with your spine. Use a smaller range of motion to decrease the challenge. Adjust resistance by using a lighter, heavier or multiple bands.
Take a moment to rest before starting the next exercise in this workout.
* YOUR NEXT EXERCISE REQUIRES THE LIGHT MINI BAND *
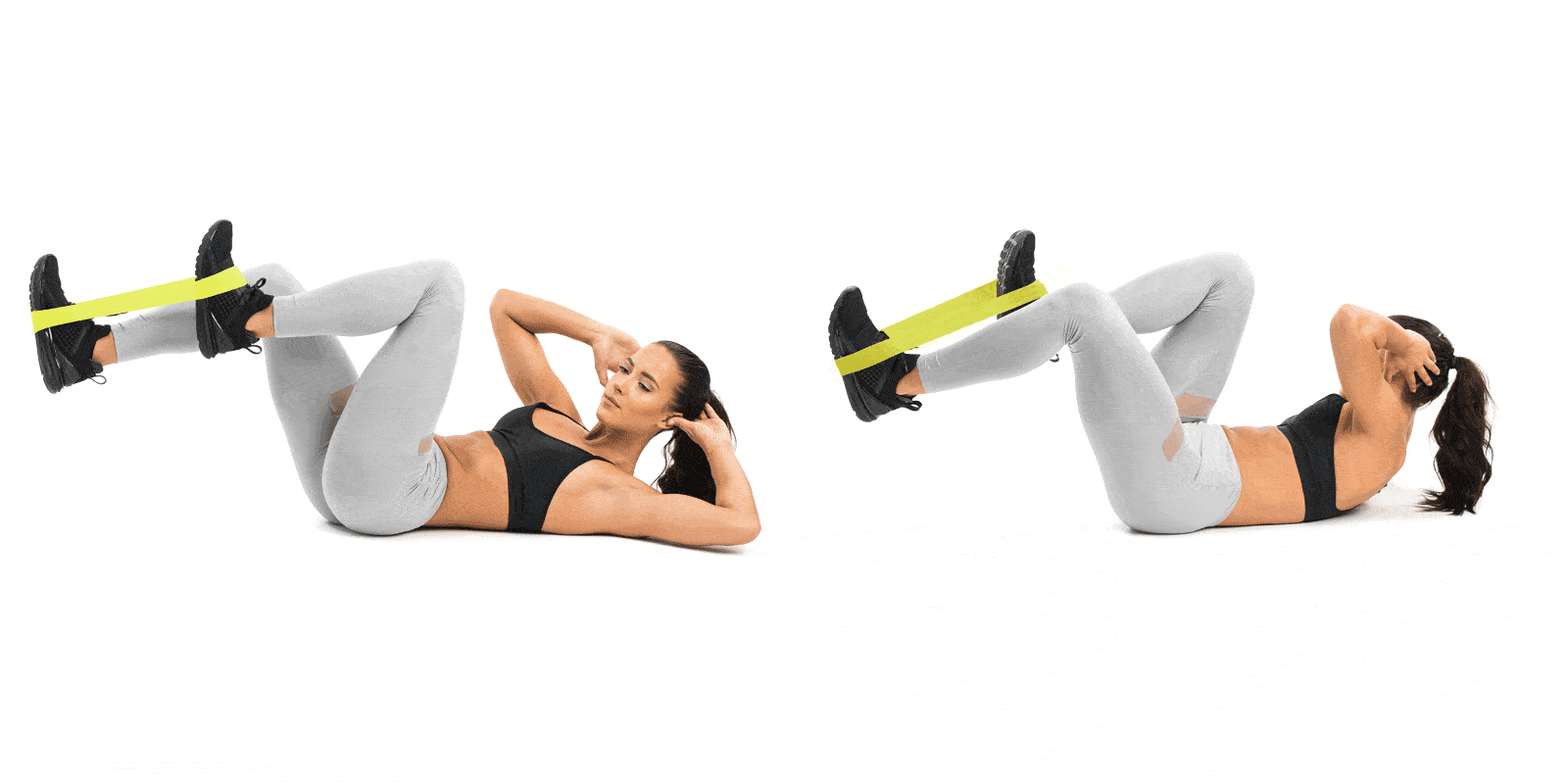
Description: From a seated position on the floor, place the band over your feet; lean back to a position where your shoulders are resting on the floor, place your hands lightly behind or to the sides of your head and simultaneously pull your knees into a bicycle position (feet off the floor and knees over your hips); begin the exercise by alternating left elbow to left knee, and right elbow to right knee; keep tension on the band throughout the repetitions and as you pull left elbow to left knee, for example your right shoulder and arm will be in contact with the floor, and your left arm and shoulder will be off the floor.
Coach’s Tip: This exercise works the core as a functional stabilizer, as well as mobility in the torso and targets core muscles, including the obliques. Avoid excessive rounding of your low back and shoulders. Don’t pull your head forward. Keep your head supported by lightly pressing it back into your hands. Be sure to pull both the knee and elbow toward one another, and not just the elbow toward the knee. To make the exercise harder, use a stronger or multiple bands. Decrease intensity by limiting ROM, slowing down or lightening the load/resistance of the band.
30 Second Break
Prepare to start round 2!
* YOUR NEXT EXERCISE REQUIRES THE STRONG MINI BAND *
Description: In a sidelying position place the band just above your knees with your right arm under your head and your left top arm resting on the floor with the elbow bent 90-degrees; keep the knees and hips slight flexed (a little bend) and the hips in line with your shoulders; maintain this stabilized start position as you externally rotate your upper leg by moving your left knee toward the ceiling; keep your feet in contact with one another and don’t open your hips (belly facing the ceiling).
Coach’s Tip: This isolation exercise target the upper back and core as stabilizers, and the glute muscles as the prime muscles being worked. Keep your head aligned, and don’t let your hips turn, resulting in your abs facing the ceiling. To make the exercise harder, use a stronger or multiple bands. Decrease intensity by limiting ROM, slowing down or lightening the load/resistance of the band.
Take a moment to rest before switching to the RIGHT LEG.
Description: In a sidelying position place the band just above your knees with your left arm under your head and your right top arm resting on the floor with the elbow bent 90-degrees; keep the knees and hips slight flexed (a little bend) and the hips in line with your shoulders; maintain this stabilized start position as you externally rotate your upper leg by moving your right knee toward the ceiling; keep your feet in contact with one another and don’t open your hips (belly facing the ceiling).
Coach’s Tip: This isolation exercise target the upper back and core as stabilizers, and the glute muscles as the prime muscles being worked. Keep your head aligned, and don’t let your hips turn, resulting in your abs facing the ceiling. To make the exercise harder, use a stronger or multiple bands. Decrease intensity by limiting ROM, slowing down or lightening the load/resistance of the band.
Take a moment to rest before starting the next exercise in this workout.
* YOUR NEXT EXERCISE REQUIRES TWO MINI BANDS *
Description: Start in an upright standing position, feet shoulder width apart, with one band placed just above your knees and the other above your ankles; step forward moving the hands and legs in opposition (just like when you walk or run); return to start position and repeat.
Coach’s Tip: This lower body sculpting exercise challenges the outer hips and glutes because of the 2-lines of opposing resistance provided by the 2-band system. Make the exercise harder by lunging deeper, using heavier bands, moving faster or increasing range of motion. Decrease intensity by limiting ROM, slowing down or lightening the load/resistance of the band.
Take a moment to rest before switching to the RIGHT.
Description: Start in an upright standing position, feet shoulder width apart, with one band placed just above your knees and the other above your ankles; step forward moving the hands and legs in opposition (just like when you walk or run); return to start position and repeat.
Coach’s Tip: This lower body sculpting exercise challenges the outer hips and glutes because of the 2-lines of opposing resistance provided by the 2-band system. Make the exercise harder by lunging deeper, using heavier bands, moving faster or increasing range of motion. Decrease intensity by limiting ROM, slowing down or lightening the load/resistance of the band.
Take a moment to rest before starting the next exercise in this workout.
* YOUR NEXT EXERCISE REQUIRES ONE MINI BAND *
Description: Set up your plank by positioning your hands underneath your shoulders, and feet shoulder width apart with the band placed around, and just above your ankles. Extend your left leg until it is inline with your glutes. Slowly return to the start position and repeat.
Coach’s Tip: This exercise will challenge your CORE and upper body as a stabilizers while working your glutes and hamstrings. Keep your head in line with your spine. Use a smaller range of motion to decrease the challenge. Adjust resistance by using a lighter, heavier or multiple bands.
Take a moment to rest before switching to the RIGHT.
Description: Set up your plank by positioning your hands underneath your shoulders, and feet shoulder width apart with the band placed around, and just above your ankles. Begin by extending your right leg until it is inline with your glutes. Slowly return to the start position and repeat.
Coach’s Tip: This exercise will challenge your CORE and upper body as a stabilizers while working your glutes and hamstrings. Keep your head in line with your spine. Use a smaller range of motion to decrease the challenge. Adjust resistance by using a lighter, heavier or multiple bands.
Take a moment to rest before starting the next exercise in this workout.
* YOUR NEXT EXERCISE REQUIRES THE LIGHT MINI BAND *
Description: From a seated position on the floor, place the band over your feet; lean back to a position where your shoulders are resting on the floor, place your hands lightly behind or to the sides of your head and simultaneously pull your knees into a bicycle position (feet off the floor and knees over your hips); begin the exercise by alternating left elbow to left knee, and right elbow to right knee; keep tension on the band throughout the repetitions and as you pull left elbow to left knee, for example your right shoulder and arm will be in contact with the floor, and your left arm and shoulder will be off the floor.
Coach’s Tip: This exercise works the core as a functional stabilizer, as well as mobility in the torso and targets core muscles, including the obliques. Avoid excessive rounding of your low back and shoulders. Don’t pull your head forward. Keep your head supported by lightly pressing it back into your hands. Be sure to pull both the knee and elbow toward one another, and not just the elbow toward the knee. To make the exercise harder, use a stronger or multiple bands. Decrease intensity by limiting ROM, slowing down or lightening the load/resistance of the band.
30 Second Break
Prepare to start round 3!
* YOUR NEXT EXERCISE REQUIRES THE STRONG MINI BAND *
Description: In a sidelying position place the band just above your knees with your right arm under your head and your left top arm resting on the floor with the elbow bent 90-degrees; keep the knees and hips slight flexed (a little bend) and the hips in line with your shoulders; maintain this stabilized start position as you externally rotate your upper leg by moving your left knee toward the ceiling; keep your feet in contact with one another and don’t open your hips (belly facing the ceiling).
Coach’s Tip: This isolation exercise target the upper back and core as stabilizers, and the glute muscles as the prime muscles being worked. Keep your head aligned, and don’t let your hips turn, resulting in your abs facing the ceiling. To make the exercise harder, use a stronger or multiple bands. Decrease intensity by limiting ROM, slowing down or lightening the load/resistance of the band.
Take a moment to rest before switching to the RIGHT LEG.
Description: In a sidelying position place the band just above your knees with your left arm under your head and your right top arm resting on the floor with the elbow bent 90-degrees; keep the knees and hips slight flexed (a little bend) and the hips in line with your shoulders; maintain this stabilized start position as you externally rotate your upper leg by moving your right knee toward the ceiling; keep your feet in contact with one another and don’t open your hips (belly facing the ceiling).
Coach’s Tip: This isolation exercise target the upper back and core as stabilizers, and the glute muscles as the prime muscles being worked. Keep your head aligned, and don’t let your hips turn, resulting in your abs facing the ceiling. To make the exercise harder, use a stronger or multiple bands. Decrease intensity by limiting ROM, slowing down or lightening the load/resistance of the band.
Take a moment to rest before starting the next exercise in this workout.
* YOUR NEXT EXERCISE REQUIRES TWO MINI BANDS *
Description: Start in an upright standing position, feet shoulder width apart, with one band placed just above your knees and the other above your ankles; step forward moving the hands and legs in opposition (just like when you walk or run); return to start position and repeat.
Coach’s Tip: This lower body sculpting exercise challenges the outer hips and glutes because of the 2-lines of opposing resistance provided by the 2-band system. Make the exercise harder by lunging deeper, using heavier bands, moving faster or increasing range of motion. Decrease intensity by limiting ROM, slowing down or lightening the load/resistance of the band.
Take a moment to rest before switching to the RIGHT.
Description: Start in an upright standing position, feet shoulder width apart, with one band placed just above your knees and the other above your ankles; step forward moving the hands and legs in opposition (just like when you walk or run); return to start position and repeat.
Coach’s Tip: This lower body sculpting exercise challenges the outer hips and glutes because of the 2-lines of opposing resistance provided by the 2-band system. Make the exercise harder by lunging deeper, using heavier bands, moving faster or increasing range of motion. Decrease intensity by limiting ROM, slowing down or lightening the load/resistance of the band.
Take a moment to rest before starting the next exercise in this workout.
* YOUR NEXT EXERCISE REQUIRES ONE MINI BAND *
Description: Set up your plank by positioning your hands underneath your shoulders, and feet shoulder width apart with the band placed around, and just above your ankles. Extend your left leg until it is inline with your glutes. Slowly return to the start position and repeat.
Coach’s Tip: This exercise will challenge your CORE and upper body as a stabilizers while working your glutes and hamstrings. Keep your head in line with your spine. Use a smaller range of motion to decrease the challenge. Adjust resistance by using a lighter, heavier or multiple bands.
Take a moment to rest before switching to the RIGHT.
Description: Set up your plank by positioning your hands underneath your shoulders, and feet shoulder width apart with the band placed around, and just above your ankles. Begin by extending your right leg until it is inline with your glutes. Slowly return to the start position and repeat.
Coach’s Tip: This exercise will challenge your CORE and upper body as a stabilizers while working your glutes and hamstrings. Keep your head in line with your spine. Use a smaller range of motion to decrease the challenge. Adjust resistance by using a lighter, heavier or multiple bands.
Take a moment to rest before starting the next exercise in this workout.
* YOUR NEXT EXERCISE REQUIRES THE LIGHT MINI BAND *
Description: From a seated position on the floor, place the band over your feet; lean back to a position where your shoulders are resting on the floor, place your hands lightly behind or to the sides of your head and simultaneously pull your knees into a bicycle position (feet off the floor and knees over your hips); begin the exercise by alternating left elbow to left knee, and right elbow to right knee; keep tension on the band throughout the repetitions and as you pull left elbow to left knee, for example your right shoulder and arm will be in contact with the floor, and your left arm and shoulder will be off the floor.
Coach’s Tip: This exercise works the core as a functional stabilizer, as well as mobility in the torso and targets core muscles, including the obliques. Avoid excessive rounding of your low back and shoulders. Don’t pull your head forward. Keep your head supported by lightly pressing it back into your hands. Be sure to pull both the knee and elbow toward one another, and not just the elbow toward the knee. To make the exercise harder, use a stronger or multiple bands. Decrease intensity by limiting ROM, slowing down or lightening the load/resistance of the band.